Using PowerPlatform to build Lasergame!
A few month back we had this internal conference. I thought it’d be fun to have a app in PowerApps even though we’re only like 60 people and the conference would last only 2 days. It was kind of like a way for me to prove that PowerApps could be created so swift that it would still be worth doing for such a small event.
I did get some help from my co-workers though, so in the end it was definitely more of a team effort. Never the less, we didn’t spend much effort on it and it still came out pretty neat!
On the first page was the agenda for the 2 days and it would automatically remove any session that had already come to an end of course. The menu at the bottom would take you to an info screen where the conference organizers could write information, important phone numbers and such. We had a QR section where there would be QR codes embedded into PowerPoints and put on display that could be scanned with the app as proof you where there and finally (most importantly) there was the gaming section!
The first page of the gaming section was for Rock, Paper Scissors where every person would show up and you could challenge them by selecting an option. If someone challenged you, they’d have an orange bar by their name and if selected an option you would simply respond with that option to their challenge. This is something I could go into so much details on, but let’s save it for another blog post.
You might notice the greyed out button at the bottom of the Gaming screen. It says “Secret” on it.
Using another app I could set the settings for this button in dataverse. The conference app reads the setting on startup and it that way I was able to keep the part of the app secret until it was time to play!

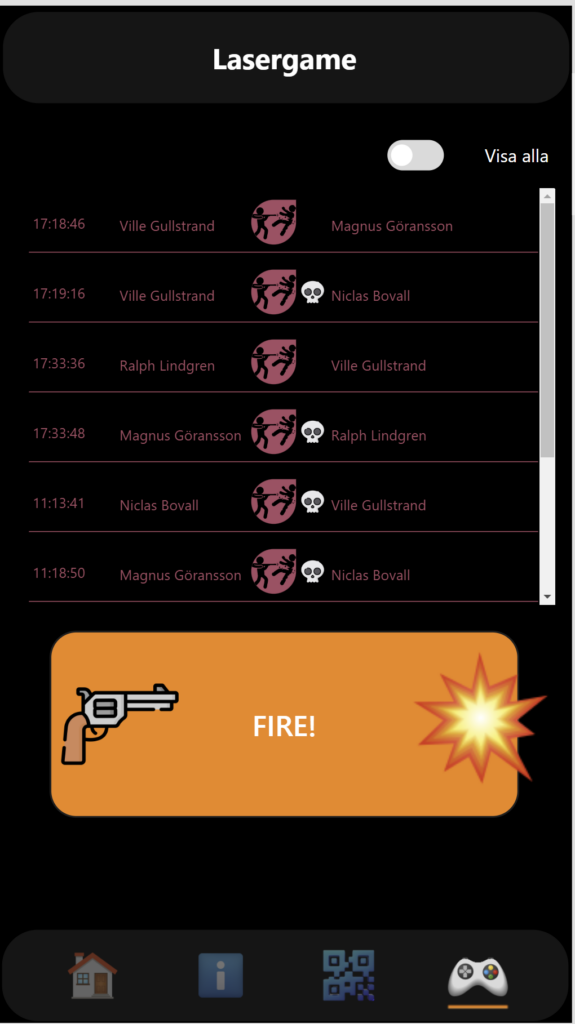
When the button was active, it would take you to another screen of the app. Super simple really! It only has a scoreboard showing the last actions that you can filter to only see your own actions and at the bottom you have a button saying “Fire!”. This would open the QR reader of the phone and upon scanning a QR code, it would patch the value into Dataverse and then I showed a GIF for about 5 seconds of a person reloading hes weapon, sort of like a cool down before you could take the next shot.
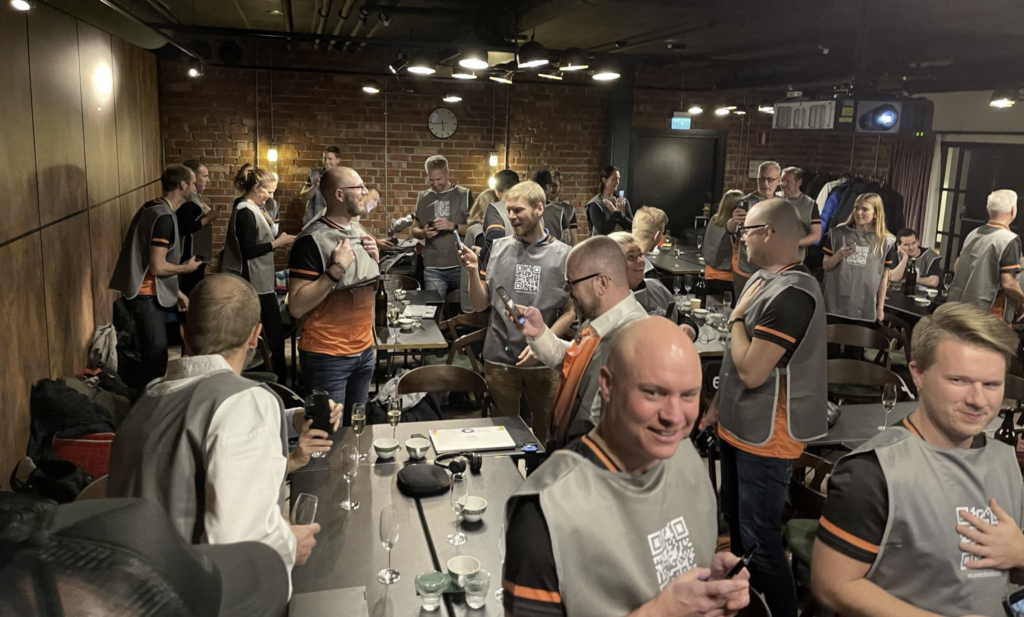
So what QR codes would you scan? Well we ordered these cheap wests with QR codes of all our UPN! Everyone got their own UPN and started to fire away!
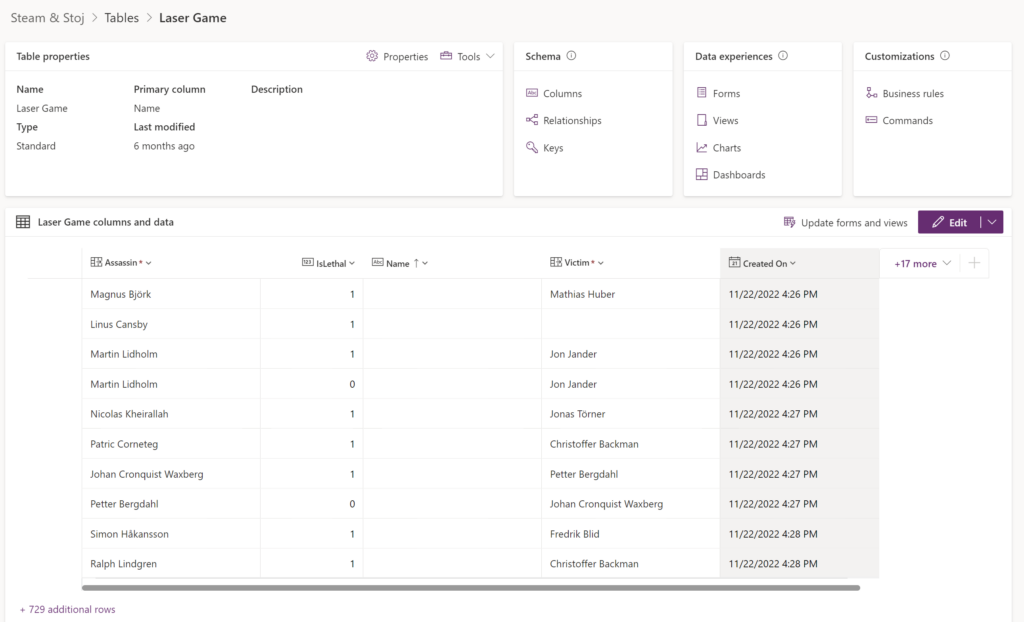
OK so back to the technical stuff. The table that was patched in Dataverse looked like this. Really simple!
The assassin and Victim columns where lookups to the systemuser table. If you scanned something else with your QR code scanner (you can scan pretty much anything) there wouldn’t be a match and I removed those rows later in Power BI.
I got the created on automatically of course and the only other column I made was “IsLethal”.
OK so in real lasergame, you cannot hit a player that’s already been hit. You can also not shoot anyone else if you already are dead in the game, right. I wanted the same feeling here, but I didn’t want the app to constantly check if someone had hit you, so I made it calculate on the value each time you actually made a hit and updated the data source either way and the player would simply not know it the shot was lethal of not until after the hit.
The code could most like be more well written, but the essence was that if you or the player you just shot was killed in the last 10 seconds, the shot would count as non lethal.
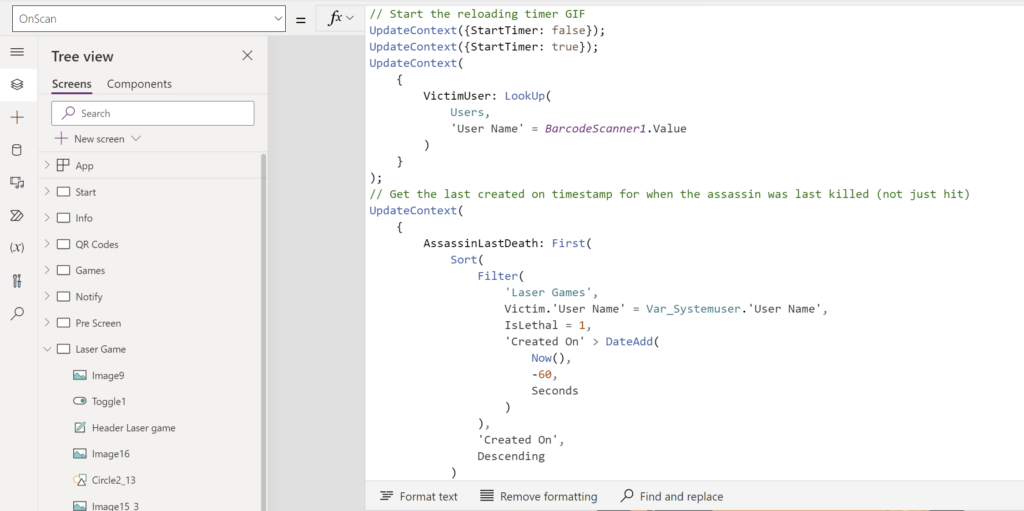
The full code of the OnScan can be found here:
// Start the reloading timer GIF
UpdateContext({StartTimer: false});
UpdateContext({StartTimer: true});
UpdateContext(
    {
        VictimUser: LookUp(
            Users,
            'User Name' = BarcodeScanner1.Value
        )
    }
);
// Get the last created on timestamp for when the assassin was last killed (not just hit)
UpdateContext(
    {
        AssassinLastDeath: First(
            Sort(
                Filter(
                    'Laser Games',
                    Victim.'User Name' = Var_Systemuser.'User Name',
                    IsLethal = 1,
                    'Created On' > DateAdd(
                        Now(),
                        -60,
                        TimeUnit.Seconds
                    )
                ),
                'Created On',
                SortOrder.Descending
            )
        ).'Created On'
    }
);
// Get the last created on timestamp for when the victim was last killed (not just hit)
UpdateContext(
    {
        VictimLastDeath: First(
            Sort(
                Filter(
                    'Laser Games',
                    Victim.'User Name' = VictimUser.'User Name',
                    IsLethal = 1,
                    'Created On' > DateAdd(
                        Now(),
                        -60,
                        TimeUnit.Seconds
                    )
                ),
                'Created On',
                SortOrder.Descending
            )
        ).'Created On'
    }
);
// Patch the hit in the Laser game table and save the row ID as CurrentHit
UpdateContext(
    {
        CurrentHit: Patch(
            'Laser Games',
            Defaults('Laser Games'),
            {
                Assassin: Var_Systemuser,
                Victim: VictimUser
            }
        )
    }
);
Patch(
    'Laser Games',
    CurrentHit,
    {
        IsLethal: If(
            Or(
                And(
                    IsBlank(AssassinLastDeath),
                    IsBlank(VictimLastDeath)
                ),
                DateAdd(
                    LookUp(
                        'Laser Games',
                        'Laser Game' = CurrentHit.'Laser Game',
                        'Created On'
                    ),
                    -10,
                    TimeUnit.Seconds
                ) > AssassinLastDeath,
                DateAdd(
                    LookUp(
                        'Laser Games',
                        'Laser Game' = CurrentHit.'Laser Game',
                        'Created On'
                    ),
                    -10,
                    TimeUnit.Seconds
                ) > VictimLastDeath
            ),
            1,
            0
        )
    }
)
And now finally to the Power BI part!
I connected to SystemUser and the Lasergame tables using DirectQuery and set up the relationship between the tables like this:
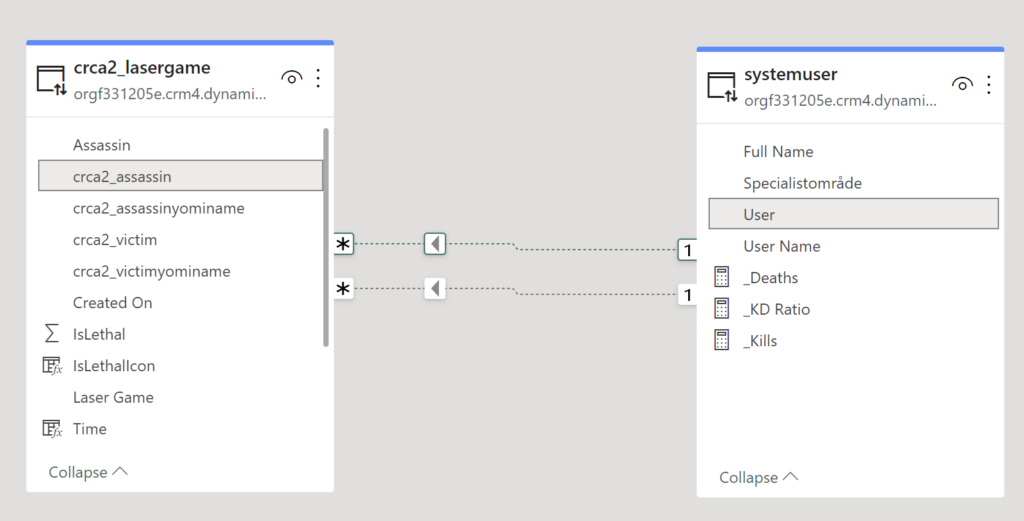
The User GUID is also related to the crca2_victim column. The thing is, both the relationships are inactive. I didn’t want either of them to be more important than the other so I decided to manually active them for my measures instead.
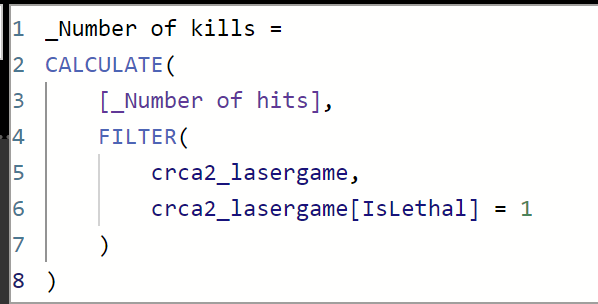
First measure is really easy, right. Just the amount of hits in Lasergame.

Based on this measure, I could create the number of kills as well (I also have a measure for the number of non lethal hits that just filters IsLethal to 0).
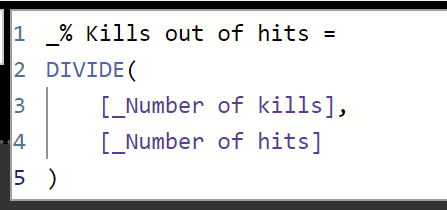
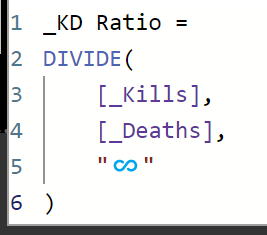
This gave me the % of hits that was lethal. I recommend using the divide function in DAX instead of just using the /-character because Divide can handle divide by 0 (by simply showing blank or whatever you want it to show).
Based on the _Number of Kills measure above, I could determine how many kills and deaths each person had by activating each relationship.
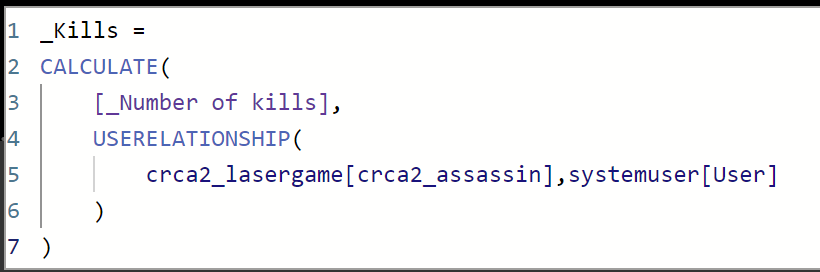
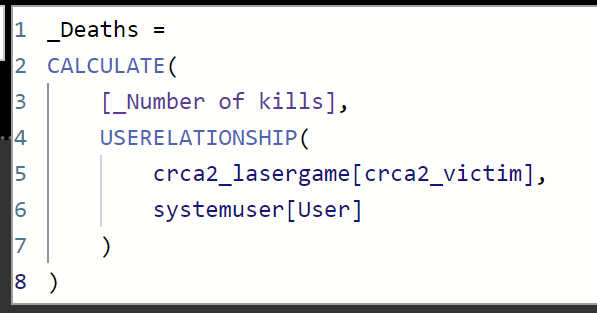
These two gave the very important Kill/Death Ratio measure that every shooter game needs.
Now all I needed to do was create a report page with some data visuals on it. When that was done, I made the next important step! Setting up page refresh rate!
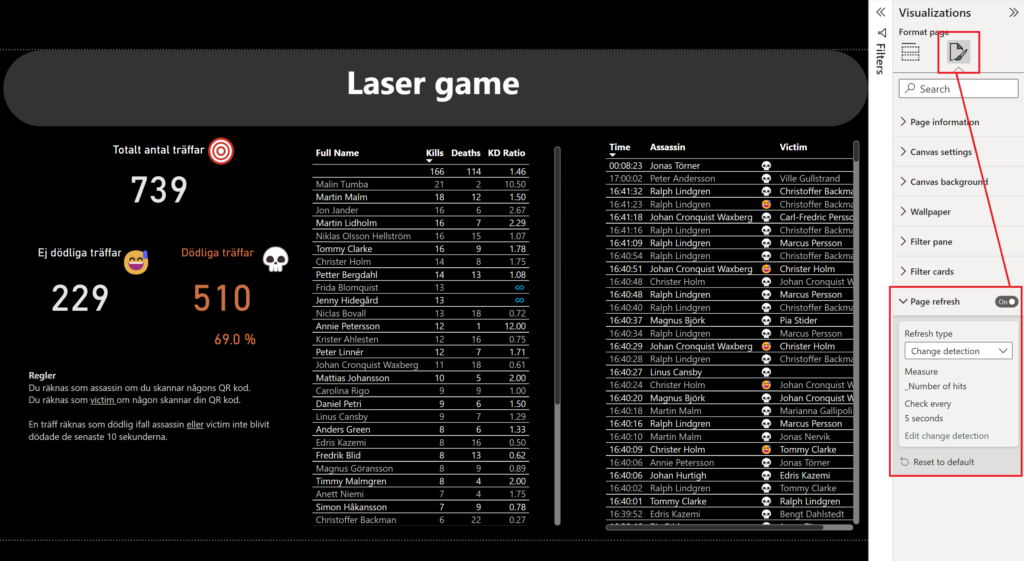
I set it up so that the page would automatically refresh every 5 seconds if there was a change detection in the number of hits-measure. If you remember, the number of hits would simply count the amount of rows in the table, i.e each time a new row was added the page would update.
This way I could put the report up on a screen for everyone to see while we played and the results would update in real time! This is why I needed to connect using DirectQuery as mentioned above.
Another important step was to publish the report to a workspace that had Power BI Premium licenses (in my case, premium per user). With the pro license you are limited to a page refresh each 30 minutes.
All right people! I really hope you’ve gotten some inspiration from this post on what to create for your own next internal kick off or conference! Reach out to me on LinkedIn to let me know how it went or if you have questions!
Cheers!