The Kaggeholm Event PowerApp
At Altitude 365, we recently held a week long kick off at Kaggeholm outside of Stockholm. This was quite possibly the best thing ever! Instead of having all our conference sessions cramped into a few hours, we had plenty of time to reflect and really work things through. For such an event, it’s crucial to have a PowerApp available for the schedule and much more. This blog post will explain the features of our Event-app as well as how you can build one yourself!

The idea
To understand the app I’m about to show you, it’s important to understand my idea behind it. I mainly wanted 2 things in the beginning:
- The schedule for the conference
- Gamification and a score to attain throughout the week
The gamification part had 2 functions: One was teambuilding and the other was to keep people interested enough to open the app once in a while during the week instead of simply asking colleagues (I.E. me) what’s next on the schedule all the time.
There will be a separate blog post about how I connected the schedule in the app to the source; a Microsoft lists-list that we used to collaborate in from an event Team in Microsoft Teams.
The Kaggeholm game
I had this idea that we were going to collect points throughout the week and that I would summarize these points in a Power BI Report that I would show a few times a day to keep people on edge. I came up with 4 ways to earn points:
- Tweet using the #Altitude365 tag (you would get 1 point per tweet and max 2 points per day)
- Scan barcodes (1 code = 2 points)
- Recieve points given by others for when you did something good (you would need to provide at least 3 points to someone else per day or you would get -3 points yourself)
- Provide feedback for the conference (1 point per feedback given)
From the first page of the app, there was a hand controller that brought you to the Kaggeholm Game screen! This screen looked like this:

Up in the right corner you could put in your twitter account name. I’ll move over to how that screen looks in a bit.
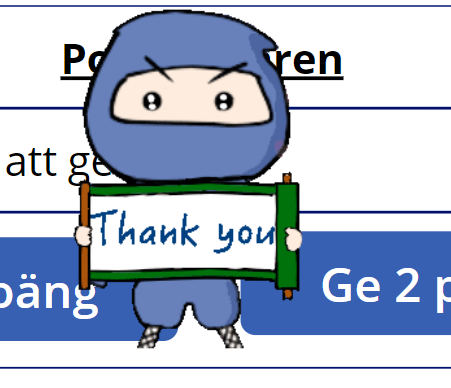
Next thing from the top was the points giver-feature! It was a simple drop down consisting of all email addresses for the employees of Altitude. The 2 buttons says “Give 1 Point” and “Give 2 Points”. When selecting a name in the list and clicking on one of the Points-buttons, a Ninja would appear with a “Thank you”-sign!
Finally you could click on “Scan a barcode”. I had prepared bar codes and published them here and there during the week, for example in the beginning of sessions or as questions with 4 possible answers in our Microsoft Team kick-off channel. Each answer had it’s own bar code, the correct answer gave you +2 points, wrong answers rewarded you with -2 points to keep people from simply trying their luck with 2 or more answers instead of looking them up first.
When clicking the Twitter button, you would end up at this screen:

Getting technical
Allright let’s start breaking this app down! We’ll start here at the twitter-screen and work backwards. There’s a field to input your username in Twitter that is based on a sharepoint list called “Kaggeholm202 – Twitternamn”. The default value is set to your own current name based on this list.

I had prepared a SharePoint list with every ones email addresses in one column and a their nicknames in the other. I filled in “No name” on everyone at first.
LookUp('Kaggeholm2020 - Twitternamn';UPN=User().Email;Twitternamn)

The button on this screen had this formula for the OnSelect option:
Patch('Kaggeholm2020 - Twitternamn';First(Filter('Kaggeholm2020 - Twitternamn';UPN=User().Email)) ; {Twitternamn: Text(TextInput1.Text)}) ;; Refresh('Kaggeholm2020 - Twitternamn')
That’s pretty much it! Depending on who you are who opens the app, you see the related value from the SharePoint list and nothing else!
The point giver feature
The app has this super simple drop down where I manually added all the email addresses for the employees. This meant you could give points to yourself as well, which I obviously punished by reversing those points in the Power BI report summarizing the score. 1 point given to yourself meant -1 point in the report.

The button for 1 Point have this formula in the OnSelect property:
Patch('Kaggeholm2020 - Poänglista';Defaults('Kaggeholm2020 - Poänglista');{UPN: (Dropdown1.SelectedText.Value)};{Poäng: 1};{Poänggivare: User().Email};{Title: 1}) ;; Reset(Dropdown1) ;; Set(NinjaVisibility;true)

Clicking the button will first patch the SharePoint list with a new row, then reset the drop-down and finally set the global variable NinjaVisibility to True. This triggers a timer:

The timer is set to 2 seconds and on the property for when the timer ends, it sets the NinjaVisibility back to false again:

I use the same variable on the Visible property of the Ninja image which means it will only show for 2 seconds after you give someone a point and then it will disappear again.

This is what the SharePoint list looks like. The UPN of the point receivers, the amount of points and the points giver UPN.

Finally we have the bar codes
I’ve added a button using the Insert – Media – Bar code scanner feature. I put the button in the bottom (say that a few times fast) of the screen and a gallery above it that visualizes the codes that have been scanned.
For the OnScan property of the Scan new Code-button, I have the patch command that will add your code to a SharePoint list. It also resets the barcode scanner, but that isn’t really necessary. I have that as a left over from an earlier version where you first had to scan the code, then confirm it before it was saved into the SharePoint-list.

Patch( 'Kaggeholm2020 - Streckkoder'; Defaults( 'Kaggeholm2020 - Streckkoder' ); {Title: "1"} ; { UPN: User().Email } ; {KOD: BarcodeScanner.Value} ) ;;
Reset(BarcodeScanner)
In the gallery, on the first row, I’ve added a trashcan icon and for the OnSelect property I make it remove the row. That way you can clean up mistakes.

The OnStart property for the App
Possibly something you usually begin with but I’m not like normal people and therefor it’s obvious that this section comes as a follow up on the bar codes! The OnStart property for the App is what the app should do when it starts. Makes sense, right. Well my app sets 3 variables as it starts.
- Popout, that I use to show details on the event schedule (I’ll get to that further down in the post)
- Easteregg is used for a secret bar code that I hid in the app
- NinjaVisibility is used to show the ninja that says thanks (see above)

On the Altitude-logo down in the right corner, I had the OnSelect property set like this:

When EasterEgg had a value of 5, Group2 would turn visible and reveal my secret barcode in the app! The Group2 also had a OnSelect property that sets the EasterEgg value back to 0, thus unrevealing it again.

The Schedule
The schedule is a gallery that I’ve connected to a list created by Microsoft Lists. We used this list as our working list in the preparation Team in Teams and when you set the status to “Done” (or Färdigt in Swedish) it would appear in the app. I also added a toggle in the bottom and if it was true/on you would see everything in the gallery. If it was false/off you would only see those sessions that had not yet passed their end time. The section in the red rectangle shows the list when the toggle in on and every item is to be shown.

If(Toggle1.Value = true ; Sort(Filter('Kaggeholm 2020';Sessionsstatus.Value="Färdig");'Startdatum och -tid';Ascending);Sort(Filter('Kaggeholm 2020';'Slutdatum och -tid' > Now()+0,375;Sessionsstatus.Value="Färdig");'Startdatum och -tid';Ascending))
As some of you might have observed, there a +0,375 in the formula. The reason I have this is because for reasons unknown to me, the timezone used in the list in SharePoint was about 9 hours back from what the app was showing. I corrected this by adding 0,375 as 1 represent 24 hours.
I had these small dots on each session in the schedule. Red meant it was mandatory and green meant free to choose.

If(ThisItem.Obligatorisk = false ; RGBA(109; 185; 102; 1) ; RGBA(194; 24; 7; 1))
To get a nice representation of the day and start time on each post, I used this formula on a label and the Text property.

Concatenate(
Text(ThisItem.'Startdatum och -tid'-0,375;"[$-sv]dddd";"sv-SE");
" - ";
Text(ThisItem.'Startdatum och -tid'-0,375;DateTimeFormat.ShortTime24;"sv-SE")
)
To get the right icon for each session I actually had 3 icons in the same place but used the Visible Property and an if statement.

If(ThisItem.Sessionstyp.Value="Pass";true;false)
If the session was of the type “Session”, it had the little red fellows. A “break” would have the knife and fork and “Fun” would be shown by a green smiley. These were available options in the Microsoft Lists list for each session owner to set.
I’ve added this transparent rectangle over the entire field. You can’t see it, but it has an OnSelect property that sets popout to true!

By clicking it, I would show a white background and some details for the selected item in the gallery on the entire screen. Another transparent rectangle that fills the entire screen sets the popout back to false.

And if you haven’t figured it out yet, I’ve set the property “Visible” to “popout” for everything in the image above, so it only shows when you’ve clicked on something and it disappears again when clicking on the screen at this point.
Teaser!
For my next blog post I’ll explain the information screen on the app that also holds some features, such as the shopping list and Notifier! Stay tuned!